Sunday, July 28, 2013

Art Basics: Colored Markers

Now it's time to experiment with different colored markers.  For this demo I'm using some Crayola markers I found at the dollar store. Practice all off the drawing techniques using both one color then mixing colors like you did with colored pencils. Markers will optically mix just like paintings from the artists who invented Pointillism.

Pointillism - A technique developed by Georges Seurat and Paul Signac around 1886.  This was a late Impressionist style of applying dots of  colors instead of broad strokes. When you place 2 different colors next to each other and view them from a little distance they will appear to blend, creating a new color and/or darker value.  This is called optical mixing
George Seurat                  1859-1891
"Afternoon at La Grande Jette"
 Let's create a drawing using Pointillism

1. Give your everyday object the spotlight again. ("Miss Pear" is getting riper!)
2.  Lightly draw the shape using a pencil
3. Cover the object with dots of light color.  
4. Next add dots of your objects main color - I used light green. Put very few dots in the areas of lightest value.


 5.  Begin to add dots of  analogous colors like blue and dark green.
6.  In your areas of darkest value add dots of the  complementary color.


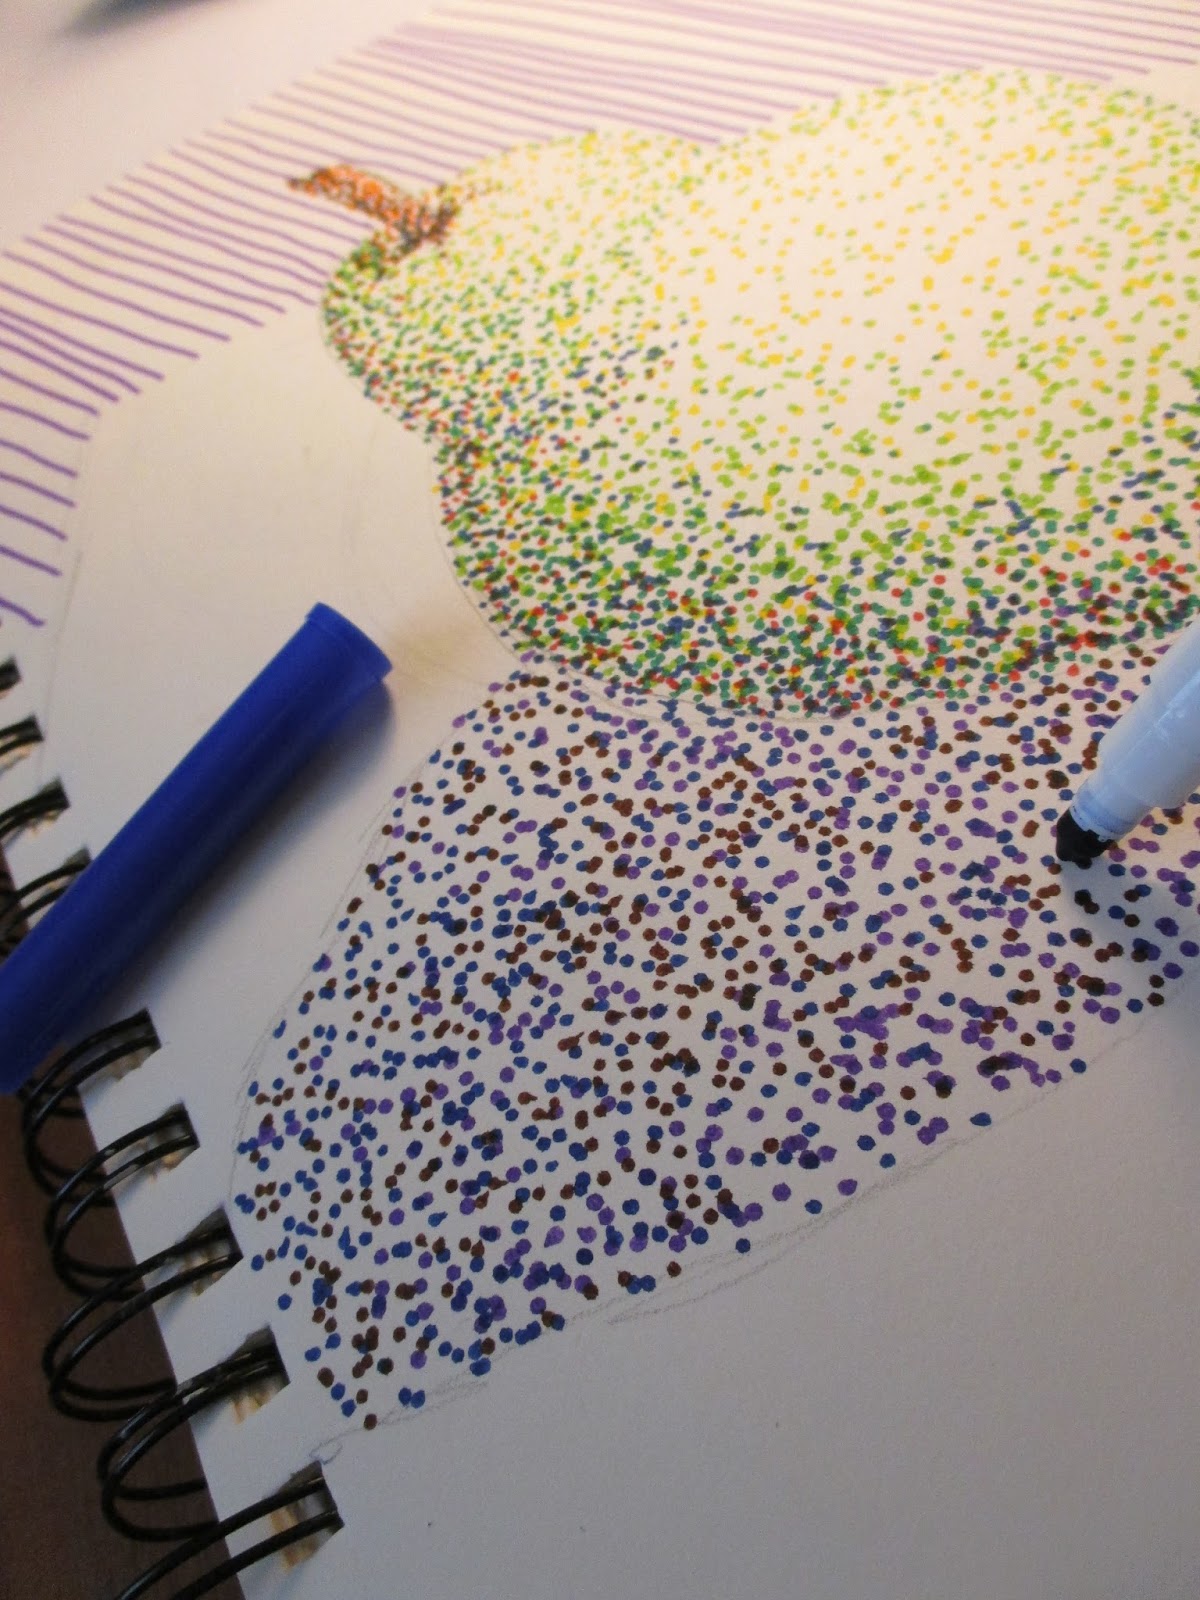
 7.  In the shadow cast by the object use cool colors like blue and purple.  Add some complementary color (orange for blue) to further darken the area.
8.  Continue adding dots of the main color after adding others.  This will help you maintain the overall color.  
9.  I used hatched lines of blue and purple to my background to help "Miss Pear" stand out.
I used orange, brown and blue for the stem.


Saturday, July 27, 2013

Art Basics: Pens & Markers

When I was in college in the late 1970's we used dip pens or the modern Rapidograph refillable pens for our drawings.  But those were better than what the Old Masters had!


Leonardo da Vinci used a sharpened feather
or stick dipped in pigment for
his drawings.


Now pens and markers come in so many shapes and sizes.

As I've said before, I am an art supply addict.  When a new color marker comes out I buy it.  It was a great day when I found the 24 pack of assorted Sharpies at Sam's Club.  We're going to explore color with markers tomorrow but today we're going to practice creating value using an ultra fine black Sharpie.

Create your value scales using:
hatching - parallel lines 
cross hatching-lines that cross in different directions.
stippling - a series of closely spaced dots

Draw 3 circles practice using those techniques turn your circles into spheres.  Don't forget to establish your light source!

Stippling takes the longest but is very relaxing.


Bring out "Miss Pear"


Each day she becomes more lovely.  Or you can bring out any simple object to draw using one of the techniques.  I recommend starting with cross hatching because it's the easiest method to create a variety of values.  And if you get a little sloppy it gives your subject a character.

Set your object on a sheet of white paper and place a light source next to it.  This will give you some dramatic shadows.  Lightly sketch the shape of the object on your paper.  Don't get to fussy, just the basic shape.  Then start adding your value and keep layering until you're satisfied.  Try it with all 3 techniques. You can even mix techniques.   Like I said before with stippling it'll take a while so you'd better put a movie on while you fill in the dots!


 Tomorrow:  Let's try this with colored markers - Yikes!

Friday, July 26, 2013

Art Basics: Colored Pencils

Class, today we will be discussing the use of colored pencils as a drawing tool.  YAWN!  I'm getting bored already.  I'm a visual learner, I love pictures so I've created a series that explains the basics of colored pencils.  Each picture describes exercises you might want to try.  The best way to learn a new technique is to do it.  Don't worry about mistakes, those are part of learning too. And forget about perfection.  Becoming more creative isn't about the product, it's about the process.

Just a few rules or "tips"
  1. Keep your pencil tips sharp. 
  2. Use light pressure when applying color.  You don't want a waxy look.
  3. Try horizontal strokes versus circular ones.  Both techniques work.
  4. Don't try to erase too much.  Even a white or kneaded erase will leave smears.
  5. If you drop your pencils the inner color core may break. You'll know because the tips keep falling out. Try heating them with a hair dryer for a few minutes.  Sometimes that will fuse the waxy color back together.

Using the side of the pencil
create a spectrum in the order
in the pictures. Overlap colors to
create tertiary colors.

Let's practice a little:
Supplies:  Sharpen colored pencils:  red, blue, yellow, green, orange and violet (purple),
                White paper or a sketchbook, white eraser, pencil sharpener.
Create this color wheel and note the brief color theory notes.
The important thing to remember is the complementary
and analogous colors.


Now practice drawing circles and turning them into spheres using colors.  When using complementary colors to create value you first cover the sphere with value like you learned yesterday.  Then you begin to layer the color opposite to darken the edge.  Finally add another layer of the original color.


Try this also with analogous colors.  Lightly layer 3 colors that are next to each other on the color wheel.  Notice how you didn't use black or white on any of these - White is the paper and  your dark value is created by the mixing of colors


Try drawing an everyday item.  I chose "Miss Pear" again today.  She's looking a little more worn but I  made her look younger and unblemished.  That's my artistic license!


Tomorrow:  What about pens?


Thursday, July 25, 2013

Art Basics: Pencils - Good old yellow #2

If you can write your name you can learn to draw. To create an artistic drawing half the battle is understanding how to use the tools. Pencils are the most basic of all art tools. They are great for quick sketches and base drawings. They are also essential in learning how to create value (a range of light to dark) on an object to give it form. They are erasable and easy to blend. You can buy expensive pencils or just some good old yellow #2's. For these exercises just dig through your junk drawer and sharpen them up.

Rule #1 - Keep your pencils sharp.  I always sharpen 2-3 pencils so I don't have to stop when the creativity's flowing.
Rule #2 - Invest in a white eraser.  The pink ones on the end of the pencil can smear.
Rule # 3 - Remember there are 2 ways to draw with a pencil - with the tip and with the side.

Using the tip
A very sharp pencil can give you a precise line that is great for drawing the shape of an object.  The tip can also be used for:
hatching
cross hatching
--Hatching - lines drawn close to each other
--Cross-hatching - lines drawn close to each other overlapped in more than one direction. 

stippling


 --Stippling - dots placed close together for darker areas and further apart for lighter.


                                      Blending Pencils

Using the side of the pencil gives you a blend of graphite.  Create a value scale from dark to light.  As you blend your pencil marks put less pressure as you get to the lighter side.  To make an even darker area add more strokes from the opposite direction. 


 Now try it on a circle.  Decide where the light source is and leave that the lightest area.  Use a white eraser to brighten up white areas


Now try drawing an everyday object like a piece of fruit.  Start with blending then try creating value using the tip. I'd love to read your comments and see your results!

Wednesday, July 24, 2013

`You have to know the rules to break them

My earliest memory about making art is a tragic one.  The year was 1963 and I was sitting in a kindergarten classroom by myself frantically trying to erase crayons.  I could hear my friends outside as they played "king of the castle" during recess.  My eyes were stinging with tears that dripped onto my work,  making my erasing job even harder.  Why was I erasing?  Because I'd broken a rule.  I had not followed the directions. On the paper there was a line of shapes:  a circle, a square, a triangle and an oval.  The instructions were to color the circle red, the square blue, the triangle yellow and the oval orange.  My problem wasn't that I didn't know my colors and shapes, I just thought the circle would look better next to the blue square if it was colored orange.  In addition, I argued, it was close to Halloween and I thought that the circle looked much better representing a pumpkin.  WRONG!!!  So I was forced to sit in the hot classroom all by myself furiously erasing the orange crayon. I remember thinking why did she choose red for the circle?  Why couldn't I choose which color I wanted to use? Forty nine years later I can still feel the heat of the room, smell the crayons, see the colors and feel the tears.  I learned early on in order to be a good girl you needed to follow the rules. I can also look back as an educator and know that she didn't make that rule to harm me. She was trying to teach me.  

I agree that rules are necessary in our society, especially in education. A classroom would be chaos if all students weren't required to follow the behavioral rules. And the art classroom is no exception. The emerging  artist needs to understand some rules to offer structure to their work. The rules of linear perspective, color theory, and composition were discovered by trial and error and offer guidelines. In my opinion,  to be a good artist you just need to learn how to break the rules in creative ways. But you need to learn the rules first!

For the next few days I'm going to write blogs posts about some of the art basics that I teach to all of my students. I'm going to explain some technical basics in drawing, painting, mixed media and a little sculpture.

Hope you'll stick around for my Art Basics: Ingredients for Creativity.

Get Ready for Class:
Dasher the dog waiting for me
to get to work in the studio.

1. Gather some basic art ingredients. My earlier post, Creativity Quest will give you some good ideas.
2. Create a list of what you would like to learn - put them in your comments to me.
3. Gather some images that you'd like to turn into art.
4. Make an art appointment with yourself to be creative- 15-60 minutes will work!

Tuesday, July 23, 2013

Trees and butterflies


During our summer fun weeks my niece Sarah and I taught kids to make things from everyday objects.  I've already described "Paper Plate Snakes" in an earlier post.  So today I thought I'd share with you "Coffee Filter Butterfiles" and "Paper Bag" Trees.
Butterflies:

You'll need:  round coffee filters, wooden clothes pins, pipe cleaner, washable markers and watercolors

1.  Draw a face and body colors on the clothes pin.
2.  Draw designs on the coffee filter using the washable markers
3.  Add more color to the filter using water colors.  The marker designs will also bleed into the colors.  Let dry
4.  Bunch the coffee filter in the middle and clip it with the clothes pin. Add the antennae (aka pipe cleaner.)
5.  Tie the butterfly to a branch or put a magnet on the back.

Paper Bag Trees


1. Cut 4-5 slits about half way from the open end of the folded paper bag.
2.  Open the bag and start crumpling and twisting.
3.  Form the trunk by twisting the main part of the bag.
4.  Now twist each cut tab to form branches
5.  Add construction paper leaves and little birds toys or drawings.


So open up your kitchen cabinets and see what art supplies you find.  You never know when you'll be inspired!