Saturday, August 31, 2013

Reflections of a teacher/mother


Peter's 1st day of kindergarten
1991
The first week of school has come and gone.  And I'm still in one piece.  I think teaching school is kind of like having a baby.  Your 9 month school year starts off with excitement, anticipation and a little nausea. You go to endless meetings about how to do your job better. You meet your students, deal will new policies, and end your last week with teacher laryngitis.  By the middle of October you should be getting over your morning sickness and anxiety as you settle in for the long haul. Your first trimester is over.

Now you begin the fun part of your pregnancy, I mean school year. Change of season and wardrobe gets you excited about the future. You cruise through the holidays because they break up the work week.  Lots of parties, seasonal cheer and winter break!  You forget what's ahead.

January.

The end of the school year seems so far away, almost an unattainable goal.  You trudge through the endless days between winter and spring feeling swollen with work and responsibilities. You're tired of the sleepless nights and backaches from being on your feet all day in the classroom.

Then you get Spring Break!.  That perfect vacation that gives you a chance to rest for the coming events.  Or if you have a burst of energy you'll take some exciting trip knowing that the coming weeks will be brutal.

Eric's graduation
from CNU
2010
Peter when he
graduated from UVA
2008.  That's Sarah, the
girl he married in June.
Toward the middle of May you become nostalgic. You see the changes in your students, how much they've grown.  You see the body of work which you inspired and nurtured. You know the end is near and changes will be happening. You almost wish you had more time to enjoy the fun things you did the past year.

Or you may just want this thing to be over


Pop

It's the wonderful birth of summer.  Full of endless possibilities and new beginnings.  It's during that time when teachers remember the three reasons they love their careers:

June----------July-----------August

And yet we keep coming back in the fall full of excitement and anticipation.  

Kind of like the pregnancy amnesia. We remember the good and forget about the uncomfortable parts. 

Peter, Eric and Johnny
I think around 1995?
I'm going to write a weekly post about each week of school this year. It may be my ramblings (like today) or maybe I'll teach you the lessons I taught the past week.  

Join me in creating a "School Year Journal."  Or call it whatever you want.  Keep track of your weekly thoughts and the images you create for the next nine months.  Feel free to share with me!


Wednesday, August 28, 2013

Painting Experiments

When I was a little girl I always enjoyed going back to school.  It wasn't just because of my friends and teachers, but is was all the great art supplies.  My favorite thing was the big wooden easel with the roll of white paper, cups of tempera paint and fat brushes.  I loved to experiment with paint. I would smear on a large blob of color, then another and another.  I would mix and move the paint all over the paper. The smell and gooey, glistening consistency of wet paint always made me happy.  And it still does.  I love the process of squeezing paint out of a tube or bottle, mixing colors and painting on a surface.  I don't always know where I'm going.  I just love the trip.

I reuse a lot of art surfaces.  I don't like to waste a thing.  So I covered the drawing I did the other day with a layer of gesso.  I could see the ghost of the drawing through the gesso so I doodled on it for a little while with some colored markers.

But I didn't want to doodle any more so I squeezed out some paint. Primary colors plus white.  I started painting over the tree blending the colors as I moved ,the brush around.


I put blue and pink on the large tree.


I spread purple on the small trees. Green on the ground and yellow in the sky.

These were under colors but I didn't like the way they looked.  So I began to cover everything with gesso again.  But this time I left a little edge of color showing.


This is where I stopped for the day.  I kind of like the ghosts of the under painting showing through.  Tomorrow I might add some new colors and see what happens.

See, painting doesn't have to end with a perfect picture.  It's just fun to spread it on!

Enjoy.

Monday, August 26, 2013

Realism vs. Abstraction

I believe that many people are afraid to make art because they haven't mastered realism. Two of my favorite artists Andrew Wyeth & Chuck Close are known for their realistic paintings.   When you view their work from a distance the realism is striking.  But when you get really close you'll see that their images are very abstract in some areas.  It took them many years of practice and experimentation to develop their individual styles.  They also spent a lot of time exploring different ways to represent their subjects.  One day I'll write a blog about different methods to capture realism.  But for now we're just going to play around with images and media. And we'll let a little serendipity help us out.

Last week I wrote a blog post about being inspired by trees. These images are still in my mind so I'm moving on from sketching in pencil to creating a mixed media piece on a large Gesso Board.  I'm not going to finish this lesson in one blog post.  There are too many steps and I'll need some drying time between layers.

Supplies:
Gesso Board, canvas board or 140 lb. watercolor paper whatever size you'd like I'm working on 24x36
Pencil
Sharpie - dark color (I used navy because that's the one I picked up!)
Gesso
Brushes


Steps:

1.  Choose you're image (You're welcome to use one of my photos from: trees)
2.  Lightly sketch your image onto the surface with a pencil.  Draw large and fill the surface from top to bottom. Go over all the lines with a dark Sharpie marker.
3.  Add some trees in the background


4.  Add a pattern to the ground.  I used small circles close to the horizon line and larger ones as I got to the bottom.
5.  On the background trees I used closely spaced hatched lines.


The finished drawing is another abstraction of my tree photo.   But I'm not finished yet.  Tomorrow I think I'll add some acrylic paint.      

Saturday, August 24, 2013

Serendipity

As I've stumbled through the years I've had the good luck to discover people, places and things that are helpful and bring me great joy.  That doesn't mean I haven't hit many rough patches. I've had to pick myself up and brush off several times. But it seems, quite often, when I fall into a rabbit hole I find a little piece of wonderland.

I'd like to tell you a little story about what happened to me today.  I'd promised to bring items to a yard sale at my friend's house.  She'd even set the date based on my preference.  But last week was full of work and complications so I didn't get a chance to go to our storage unit to sort and gather.  I'd figured I could take care of it Friday night.  At the last minute my husband decided to go to a golf tournament so I knew I'd be on my own for the sorting and loading.

When I got home from work I took Dasher, the dog, for a walk.  It was so hot and when I got home I had a terrible headache and decided to go to bed early.  I planned on sorting and loading the items in the morning.  I'm usually an early riser (6:00 am) and didn't thing to set my alarm.  When I woke up at 8:45 I jumped out of bed, feeling guilty about being late.  I threw on come clothes and grabbed the spare set of truck keys because I couldn't find the regular ones. Looking outside I realized that my husband hadn't left the truck at home.  So I headed to the storage unit in my smaller car.

 I started to work in the storage unit I by moving a mattress outside.  As I was digging through the shelves I heard a voice behind me.  I turned around to see a woman with a little girl standing in the doorway.  She asked, "are you selling this mattress? Because my daughter and I getting our stuff out of storage to move into an apartment nearby."

"No, I'm not going to sell it," I said, "I'm going to give it to you."

After I helped her tie the mattress to the top of her car I asked if she'd like any of the items I'd pulled out for the yard sale.  Soon all of the boxes were loaded in her car.  She tried to hand me some money but I refused to take it.  My goal was to declutter my storage unit, not make money.  And I knew the items were going to make a difference for the mother and daughter as they embark on their fresh start. When I showed up at my friend's house empty handed we laughed.

Being an artist I rely on serendipity every time I begin a new work.  So today I have a blank gesso board a tree picture and some acrylic paint.  I'm going put on some music, pour some iced tea and see what kind of "happy accidents" I can get into!

Want to come along?

Thursday, August 22, 2013

Doodling away!!


School is starting next Monday so this week was full of meetings and long planning sessions.  I get very restless at these types of events so I always carry a sketchbook and pen with me.  I doodle while I listen to the presentation because it helps me listen, focus and stay awake.  This is a coping strategy I learned in middle school.  Sometimes it got me in trouble, but most of the time it helped me learn better (and stay out of trouble because I'm always restless!)  Because of doodling those endless meetings became opportunities to create while I learned.

Coincidentally I was noodling around on the Internet to find videos to inspire my students and came across one that talked about importance of doodling.  Take a few minutes and enjoy thisTED talk by Suni Brown about doodling.

Suni's new definition of doodling is one that I too would like to see in the dictionary:

Doodling - To make spontaneous marks to help yourself think.

So get out a pen and start thinking!
Yesterday I started this doodle inspired by my son and his bride leaving for
their honeymoon.  Hopefully I'll finish it before they get back!


Wednesday, August 21, 2013

Line abstraction with trees.

I love to doodle.  Sometimes I don't feel like making art that requires a lot of deep thought.  I just want something to work on while I watch TV or listen to music. Doodling's how I relax.

I have those wonderful tree pictures and decided to do a large doodle about them.
1.  Use a pencil to create a simple sketch of the tree.
2.  Go over all lines with a black Sharpie marker
3.  Add a horizon line and some smaller trees in the background.  This will give you some visual depth and interest.

4.  Cover the whole surface with white paint - Gesso or tempra.  You want it to be a bit translucent so you can see the ghost of the black lines through it.  You can barely see the lines in the picture on the left.


 5.  Now you're going to work in the negative space around the big tree.  First I used a light blue marker in the area that would be the sky.
6.  Then I used a dark blue marker for the the background trees.  Notice I used straight parallel lines (hatched) for the sky and curved ones for the tree trunks.
7.  For the ground I used wavy parallel lines in green.
 

8.  On the large tree I used a black marker and a continuous squiggly line starting with the large trunk.  I continued on each of the smaller trunks with more lines.


 Here's the finished work.  I'm not sure if I'm done yet or ready to move on to a new tree project.  I'll decide that tomorrow.


Tuesday, August 20, 2013

Watercolor about trees

Let's Paint!


Supplies:
Watercolor paint:  Pthalo Blue, Alizarin Crimson, Cadmium Yellow, Sage Green, Burnt Sienna.  You can try this with Crayola watercolors if you'd like. Assorted brushes, water cup, white crayon, paper towels.


1.  Mix a puddle of Sage Green and Purple (Pthalo Blue + Alizarin Crimson)

2. Using wet on wet (see Art Basics: Watercolors) paint the space around the tree (negative space) with green and purple above the horizon line.  Paint wet on wet using yellow below the horizon line. Don't worry about being too neat around the branches.- in fact go over the lines a little.


3.  Use a hair dryer to dry the paint.
4.  Mix more puddles of purple, green, yellow and burnt sienna.


Yes, the picture is
up-side-down
It still should look a
little sloppy
5.  Now your going to paint the illusion of some trees in the distance by painting the space around them darker.  This will give the illusion of deeper space. I made up a bunch of trees that weren't in the photo. Above the horizon line I used purples and below I used burnt sienna and yellow.
   

6  Mix a puddle of blue and of burnt sienna.  Mix a third puddle of the two combined.  This will give you a rich grey.
7.  I used a white crayon to add some light areas of texture to the branches of the large tree.  These areas will resist the paint leaving white showing through.  Don't do too much!!
8.  Refer to Art Basics: Watercolors and paint clear water on the big tree branches.  I start with the ones in the back first. While the branch is wet paint some of the grey along the edge.  The paint will move some to give the illusion of a cylinder.  You may need to add a little more paint or water to get some areas darker or lighter.  I also alternated between blue, grey and burnt sienna.

9.  Continue adding color to all branches.

10.  Dry all branches with the hair dryer.

11.  Now use a dry brush technique to add more texture to the large tree.  Paint a puddle of grey, blue or burnt sienna to the darker edge of the branch. Then with a brush that you've dried on a paper towel move the paint over getting a "scratchy" look.


12.  Using varying sizes of brushes dab on some leafy areas and doodle on some skinny branches and other details.

13.  Add some blue shadows on the ground and sign your work.

14.  The most important step is STOP before you over paint.

 Step back and enjoy your watercolor painting "About a Tree"


Next:  Let's get more abstract!

Monday, August 19, 2013

Stop worrying about realism!

Judy Chicago      The Dinner Party
Famous for her work
about issues in feminism.
Some artists have fragile egos.  Especially the new ones. When I was an undergraduate majoring in art (1976-1980) I was constantly feeling self conscious about my work.  Artists during that time were in the post modernist movement creating work in many different styles from neo-expressionism to feminism.  We were required to master techniques in realism and abstraction.  I was caught somewhere in the middle.  I successfully got through my coursework by becoming a chameleon.  I would adapt my style to meet the instructors requirements.  Because I was afraid of failure.

After college I spent several years trying to figure out how to be an artist and pay my bills.  So I worked as a bartender and was an artist in my off time participating in shows and doing some commissions.  I then stumbled into jobs in sales management and abandoned my art altogether for about 8 years.  I got married, had 2 children and quit my sales management job in advertising.  I wanted to focus my attention on my kids and begin to carve out some time to make art again. I updated my credentials and started teaching art in an elementary school in 1994.  Since then I've taught art to students in all levels of public school (K-12), community college and adults at the community center.  I've taken and taught courses in drawing, watercolors, painting, mixed media, printmaking, fused glass, jewelry making and many more that I can't remember.  In 2003 I completed my master of interdisciplinary studies degree with a concentration in painting from Virginia Commonwealth University.  Yet with all this experience and training I still have some anxiety about my art.  But I'll never stop creating!

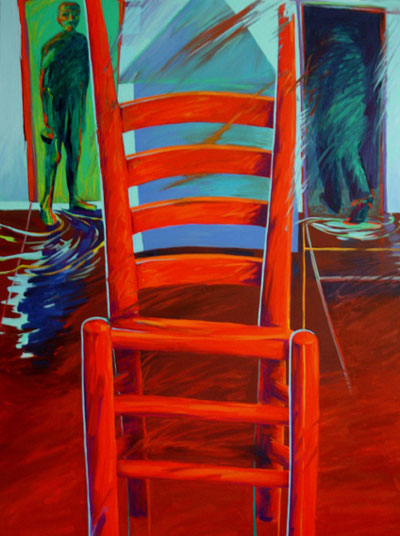
Red Chair
Coming and going  by Diana Marta
The most important lesson I learned was from Diana Marta, an artist I took classes from in Ellicott City, MD during the 1990s.  She'd set up a still life for us one day using a chair as the focal point.  As she demonstrated the technique for that day she made the following statement:  "Don't just make a painting OF the chair. Make a painting ABOUT the chair!!"   And that's how I've approached my art and teachingever since!

Over the next few day's I'd like to explain a few different ways you could create art about trees.  But I don't want you to get caught up in realism - use your camera for that.  Instead I'd like for you to experiment with art and enjoy the process.  Today I'd like to you to refer to one of last weeks blog posts, find something to inspire you.  Get out a sheet of watercolor paper and lightly sketch a tree on it. Don't add any value. Tomorrow we'll add watercolor.

Tomorrow:  Get out your brushes and get ready to paint.